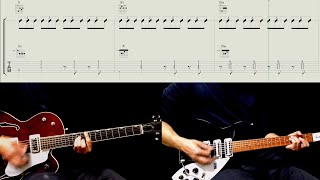
Chords for All My Loving | John Lennon's Rhythm Guitar Techniques
Tempo:
98.05 bpm
Chords used:
F#
E
C#m
F#m
B
Tuning:Standard Tuning (EADGBE)Capo:+0fret
Jam Along & Learn...
Alright guys, today I'm going to show you how to play All My Loving, the rhythm guitar part.
minor.
like if you played an F [F] down here,
[F#] your ring finger up a string and then you put your pinky on the fourth string on the
[F#] move that up one fret and then you take your [F#m] middle finger off.
So it'll start off on that chord.
to play through, I'm going to show you
So [F#m] F sharp [D] minor and then to [B] B.
100% ➙ 98BPM
F#
E
C#m
F#m
B
F#
E
C#m
Alright guys, today I'm going to show you how to play All My Loving, the rhythm guitar part.
_ It's going to start out on an F [F#m] sharp minor.
_ _ _ _ [F#] You want to try to play it like if you played an F [F] down here,
_ _ but you move [F#] your _ ring finger up a string and then you put your pinky on the fourth string on the
third fret.
_ [Am] And then you just [F#] move that up one fret _ and then you take your [F#m] middle finger off. _ _ _
So it'll start off on that chord.
_ _ [F#] So I'm just going to play through, I'm going to show you
the chords and then I'll show you how to strum it.
So [F#m] _ F sharp [D] minor and then to [B] B.
_ _ _ So [A] you're pretty much going to take an A down here, then [F#] you move that up the fourth fret and then
put your first finger on _ the [B] first, second, third [F#] and fourth string [F#m] on the second fret.
So _ you have the F sharp minor and [B] then the B _ _ and then [E] to C.
And you just want to play the
first, second, third and fourth strings.
And then to a C sharp [C#m] minor, _ _ _ _ which you can play like this
or like this.
I don't think it matters for this chord.
So, so far for the [F#m] chords, _ [B] E, _
_ [E] E, _ C sharp [C#m] minor. _
_ And then [B] to [A] an A. _ _
[F#m] So I'm just going to play through what we have so far.
_ _ [B] _ _
[E] _ _ _ [C#m] _ _ _ [A] _ _
_ [F#] And then you're going to go back to the F sharp [F#m] minor. _
_ _ Then to the, to [N] a D with the pinky.
[D] _ _ _ _ _ _ [F#m] And then [B] instead of playing a [G#] B, [B] we're going to play a B7.
_ _ [F#] _ So _ that's pretty much it for the
verse.
[C#m] For the chorus, it's going to be C sharp minor.
_ _ [E] _ _ To this chord, which I'm not sure what the name of it is, [G#] but your first finger is [F#] on the fourth fret. _
_ _ _ _ Your second finger is on the third string on the fifth fret and your ring finger is on the
second string on the fifth fret.
[D#] And then your pinky is on the fourth string on the sixth fret.
[C] _ _ _ _ [F#] _ _ _
[C#m] _ _ [Am] _ _ Then to [G#] an E chord, which we [E] did before.
_ _ _ _ [C#m] _ _
_ [C] _ _ [F] The strumming is just like, _ _
[F#] _ _ _ _ it's just kind of, _
_ [E] _ _ if you, [F#m] if you just, I'll do it in slow motion so you can see this
and I'll try to get the camera zoomed in. _
_ _ [N] _ If you play a downstroke, then downstroke again,
and then an [C#m] upstroke.
_ [E] _ _ _
So [B] that's pretty much it.
When the solo comes in,
[G#] _ [D] it's going to be an A, you're going to play an [A] A7 _ and _ _ then an E [E] chord. _
_ _ _ _ _ [B] _ _ _
_ [E] _ _ _ _ [F#] These, that's _ _ _ _ pretty much it for the, for the chords.
For the rhythm, rhythm pattern during
the verse, it's just going to be down, up, [C#] down, up, down, up, [F#m] but really fast.
So _
you [F#m] just pretty much try to do that really [F#] fast through the whole verse.
For the end, end bit, which [Em] was up here.
Oh, sorry.
_ [C#m] _ _ _ _ [E] _ _
_ [F] You're just going to take the F shape and take off your [Fm] middle finger _
_ [F] and bring that up to the [C#m] ninth fret.
_ _ _ [E] _ And just [C#m] play a little, _
_ _ _ _ _ _ [D#m] _ _
[C#] and it just [E] kind of, [D#] once you play it, it'll be easier once you figure it
out.
All [C#m] right.
So _ _ _ then move that [E] up to the 12th fret, _ but you're going to [D#] actually add your middle
finger on the third string, _ which would be on the 13th fret.
[E] _ _ _
_ _ _ _ [C#m] Do a little slide there.
_ _ _ _ _ _ _ _
_ _ [F#] _ So I hope that covers most of the parts of