Chords for Introduction to Finger Picking - Guitar Lesson
Tempo:
116.8 bpm
Chords used:
G
Em
C
F#
D
Tuning:Standard Tuning (EADGBE)Capo:+0fret
Jam Along & Learn...
Hi, this is Brian Wall with worship tutorials.com. I have a lesson today for you on
or finger picking when you're playing guitar
be sort of an intro and we're planning to do a series of lessons on
a basic pattern or two
so the first thing just to demonstrate what I'm talking about
Is this kind of thing?
[Em] [C] [Em]
[E] Okay, so the first thing you want to know about this is we're going to match up fingers and
100% ➙ 117BPM
G
Em
C
F#
D
G
Em
C
_ Hi, this is Brian Wall with worship tutorials.com. I have a lesson today for you on
Finger style or finger picking when you're playing guitar
This is going to be sort of an intro and we're planning to do a series of lessons on
This so this is just going to be an [F#] intro and I [G] might show you a basic pattern or two
To play to get you started so the first thing just to demonstrate what I'm talking about _
Is _ _ _ _ _ this kind of thing?
_ _ [C] _ _ _ _
_ [Em] _ _ _ _ [C] _ _ [Em] _
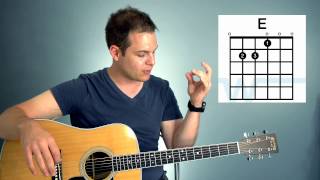
_ _ [E] _ Okay, so the first thing you want to know about this is we're going to match up fingers and
Strings [F#] so I like to go at this sort of systematically when [N] you're thinking about
_ Finger picking so the first thing I do is well you've got five [Em] fingers, so [G] I
Like to take my pinky and plant it on the body of the guitar usually right here
Kind of right near the sound hole of the guitar now not everybody does this it's not something you have to do
It's just what I was taught and how I kind of do it and the reason I do this is it [Em] kind of anchors my hand because
Each finger is going to correspond to a string when you pluck the string
[G] So your [Em] thumb is always going to get the bass or the root note of the chord that you're playing
[Gm] Typically [Em] this is going to be the low e or the a string
[D] Sometimes it's going to be the D [C] string for example [F#] the D chord the root note and the bass note [D] is
[F#] That D [Em] string so in that case your thumb usually is going to cover
[D] _
these [G] three bass strings _
that leaves
Two three and four fingers your index finger.
I'm sorry one two and three one two three
That's how we talk about how we number our fingers so the index finger one is
_ Always in my case the way.
I do this is always going to pluck the G string
your [Em] second finger your middle finger [B] always is on the B string and
Then your third finger your ring finger always
It's the high E string so [G] whenever we want to pick out a pattern
It's just a matter of which fingers, and [F#] what is the progression of [G] finger pluck?
[F] Finger plucking that I am going to do which fingers are you going to use?
so again we anchor with our pinky and then the thumb gets the root note and then one [G] two three on
G B and E strings
So to practice this and put it in
Put this one into practice for you.
Let's just play a G chord
_ And I would like you to use this very simple pattern of thumb one two
One and one two one are the the one and two fingers the strings you're [B] hitting are going to be e _ _
G B G _ _ _ _
_ _ _ Okay _ _
Technically you're going to be playing these in eighth notes, so if you [G] think of our count as one two three Three
_ four the ups and the downs constitute [Em] the eighth notes and you count them as and one and
two [E] and three and four and thumb one two one thumb one [G] two one
_ _ _ thumb one two one thumb one two one thumb one two one
Okay, [N] the secret to this is going to be to start slow
So start with a slow [Em] tempo and [G] just pick it out
_ _ thumb one two one thumb one two one
_ Two things you're gonna want to do as [Em] you practice the first thing is to get [G] faster
So we started slow once you get comfortable with that
_ Pick up the pace a little bit.
_ _ _ You just want it to be smooth and
You want to make sure that the right fingers are plucking the right strings
[Em] The next thing you want to do is switch [G] chords so thumb one two one thumb one two one
Maybe switch to a C
[C] _ _ [G] _
Would help if I play the right note _ _ _ back to G now you notice when I switch to that C.
I'm gonna do it again
switch to the C
_ My thumb is hitting the root note in the case of the [C] C
It's the a string on the third fret which is a C.
[G] _
_ _ I switch to a D _
Now my thumb is gonna hit the [D] D string _ _ _
_ _ _ Go to an E [Em] minor _
_ _ The root note is the low E.
You can also play the a [G] string
_ _ _ _ back to a C
_ _ _ _ _ And then end it on the G
_ _ _ Okay, so when you practice work on getting faster and then work [G] on changing chords
Ultimately the goal is you want the changes to be smooth so when you change chords at first
It's gonna be like this
_ There we go got to the C _ and then go to a D
_ [D] _
_ _ So you want to if you're just starting out you're gonna find that that's what's gonna happen
[G] But you want that to be a smooth transition, and it'll come with times just keep practice _ _ _ _ _ and there you have it
That is sort of [Em] an intro to finger picking that's the way I go about doing it
We'll have more lessons coming up in this series soon.
We'll see you then thanks for watching
[C] Hey, _ _ _ _ this is Brian with worship tutorials
Calm the music that you hear in the background right now is called pads
And I believe pads can help completely transform your worship sets they can help you create awesome
Environments they can really help you with transitions and just help make everything
Smooth so what pads are is a sound bed that helps create warmth and atmosphere if you head over to worship tutorials
Calm by clicking the link here in the video you can sample the pads
You can listen to the actual sounds that you will get you can play along to them to see how they might work in your
Workflow what you get are 12 mp3 files.
They're 20 minutes long each
There is one file for each of the 12 major keys these pads are not progression specific
So that means you don't need to click track for example if you're playing a song in the key of G
You can just play the key of G pad underneath your song and anything you play in that key will just fit right in
It'll be seamless and they just sound great so head over to worship tutorials check them out
I hope that these are helpful for you.
Thanks _ _ _ _ _ _
Finger style or finger picking when you're playing guitar
This is going to be sort of an intro and we're planning to do a series of lessons on
This so this is just going to be an [F#] intro and I [G] might show you a basic pattern or two
To play to get you started so the first thing just to demonstrate what I'm talking about _
Is _ _ _ _ _ this kind of thing?
_ _ [C] _ _ _ _
_ [Em] _ _ _ _ [C] _ _ [Em] _
_ _ [E] _ Okay, so the first thing you want to know about this is we're going to match up fingers and
Strings [F#] so I like to go at this sort of systematically when [N] you're thinking about
_ Finger picking so the first thing I do is well you've got five [Em] fingers, so [G] I
Like to take my pinky and plant it on the body of the guitar usually right here
Kind of right near the sound hole of the guitar now not everybody does this it's not something you have to do
It's just what I was taught and how I kind of do it and the reason I do this is it [Em] kind of anchors my hand because
Each finger is going to correspond to a string when you pluck the string
[G] So your [Em] thumb is always going to get the bass or the root note of the chord that you're playing
[Gm] Typically [Em] this is going to be the low e or the a string
[D] Sometimes it's going to be the D [C] string for example [F#] the D chord the root note and the bass note [D] is
[F#] That D [Em] string so in that case your thumb usually is going to cover
[D] _
these [G] three bass strings _
that leaves
Two three and four fingers your index finger.
I'm sorry one two and three one two three
That's how we talk about how we number our fingers so the index finger one is
_ Always in my case the way.
I do this is always going to pluck the G string
your [Em] second finger your middle finger [B] always is on the B string and
Then your third finger your ring finger always
It's the high E string so [G] whenever we want to pick out a pattern
It's just a matter of which fingers, and [F#] what is the progression of [G] finger pluck?
[F] Finger plucking that I am going to do which fingers are you going to use?
so again we anchor with our pinky and then the thumb gets the root note and then one [G] two three on
G B and E strings
So to practice this and put it in
Put this one into practice for you.
Let's just play a G chord
_ And I would like you to use this very simple pattern of thumb one two
One and one two one are the the one and two fingers the strings you're [B] hitting are going to be e _ _
G B G _ _ _ _
_ _ _ Okay _ _
Technically you're going to be playing these in eighth notes, so if you [G] think of our count as one two three Three
_ four the ups and the downs constitute [Em] the eighth notes and you count them as and one and
two [E] and three and four and thumb one two one thumb one [G] two one
_ _ _ thumb one two one thumb one two one thumb one two one
Okay, [N] the secret to this is going to be to start slow
So start with a slow [Em] tempo and [G] just pick it out
_ _ thumb one two one thumb one two one
_ Two things you're gonna want to do as [Em] you practice the first thing is to get [G] faster
So we started slow once you get comfortable with that
_ Pick up the pace a little bit.
_ _ _ You just want it to be smooth and
You want to make sure that the right fingers are plucking the right strings
[Em] The next thing you want to do is switch [G] chords so thumb one two one thumb one two one
Maybe switch to a C
[C] _ _ [G] _
Would help if I play the right note _ _ _ back to G now you notice when I switch to that C.
I'm gonna do it again
switch to the C
_ My thumb is hitting the root note in the case of the [C] C
It's the a string on the third fret which is a C.
[G] _
_ _ I switch to a D _
Now my thumb is gonna hit the [D] D string _ _ _
_ _ _ Go to an E [Em] minor _
_ _ The root note is the low E.
You can also play the a [G] string
_ _ _ _ back to a C
_ _ _ _ _ And then end it on the G
_ _ _ Okay, so when you practice work on getting faster and then work [G] on changing chords
Ultimately the goal is you want the changes to be smooth so when you change chords at first
It's gonna be like this
_ There we go got to the C _ and then go to a D
_ [D] _
_ _ So you want to if you're just starting out you're gonna find that that's what's gonna happen
[G] But you want that to be a smooth transition, and it'll come with times just keep practice _ _ _ _ _ and there you have it
That is sort of [Em] an intro to finger picking that's the way I go about doing it
We'll have more lessons coming up in this series soon.
We'll see you then thanks for watching
[C] Hey, _ _ _ _ this is Brian with worship tutorials
Calm the music that you hear in the background right now is called pads
And I believe pads can help completely transform your worship sets they can help you create awesome
Environments they can really help you with transitions and just help make everything
Smooth so what pads are is a sound bed that helps create warmth and atmosphere if you head over to worship tutorials
Calm by clicking the link here in the video you can sample the pads
You can listen to the actual sounds that you will get you can play along to them to see how they might work in your
Workflow what you get are 12 mp3 files.
They're 20 minutes long each
There is one file for each of the 12 major keys these pads are not progression specific
So that means you don't need to click track for example if you're playing a song in the key of G
You can just play the key of G pad underneath your song and anything you play in that key will just fit right in
It'll be seamless and they just sound great so head over to worship tutorials check them out
I hope that these are helpful for you.
Thanks _ _ _ _ _ _